Chimney Sweep

Chimney Maintenance Tips

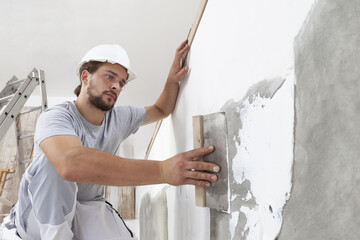
A fireplace and chimney add a cozy touch to chilly winter evenings. However, they’re also exposed to the harsh elements and need Baltimore Chimney Repair. Without proper care, a chimney may experience structural damage or chimney fires. It can even leak water or release carbon monoxide, a toxic gas.

Chimney Maintenance

Chimney maintenance can help prevent these problems and keep your family safe. A professional can inspect the chimney’s interior and exterior to identify issues that homeowners may miss.

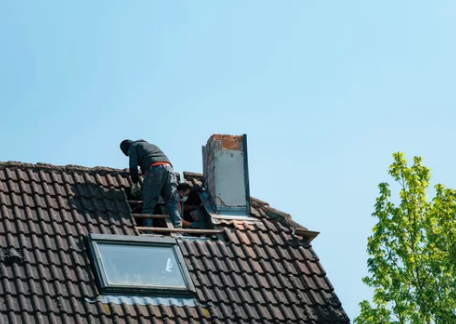
A chimney’s flashing isn’t as obvious as the bricks and flue itself, but it plays an important role. Located where the chimney meets the roof, it keeps moisture from entering the structure and damaging the roof or attic. Flashing is typically made of either steel, aluminum, or copper and can last up to 30 years under the right conditions.

During routine chimney maintenance, it’s a good idea to check on the flashing. If a leak is present, it can cause wood rot, ceiling damage, and other issues throughout the home.

If you notice stains on your ceiling near or above the fireplace, a chimney flashing leak may be present. This is a common problem that’s easy to miss, especially when the weather is wet. Rain damage from a leaky chimney can spread into the walls, ceiling, and attic, leading to expensive repairs.

Chimney flashing is composed of three pieces: the bottom base flashing, the lower cap flashing, and the top flashing. The bottom base flashing is a piece of metal that wraps around the chimney and the roof and is fastened with roofing nails or mortar. The lower cap flashing is a separate piece of metal that covers the base flashing and is also secured with mortar or roofing cement.

The top flashing is a single piece of metal that is bent to form a hem around the chimney and is also fastened with mortar or roofing cement. It’s important that the flashing has adequate overlapping to create a watertight barrier between the chimney and the roof.

Other flashing concerns include missing shingles that can allow moisture to enter, and animal or nest infestations. If you notice a sudden increase in bird or squirrel activity, or you discover raccoon or other animal droppings inside your chimney, it’s important to call a professional right away. These creatures can block smoke from venting out of your home and lead to dangerous carbon monoxide buildup.

It’s always best to have a professional handle these issues, but you can help by regularly checking on your flashing. Use a ladder to carefully lift the shingles and examine the horizontal projection of the side base flashings. The flashing should extend down at least 4 inches on each side of the chimney. If the flashing is damaged, you’ll need to have it replaced.

The chimney flue is where your fireplace vents smoke outside. However, the incomplete byproducts of combustion, including carbon and sulfur, cling to the chimney walls, similar to tartar on teeth. If these deposits are not removed on a regular basis, they absorb moisture and start a deterioration process known as spalling and flaking that weakens the chimney masonry. Moisture can also cause water damage to the chimney chase, crown and wall surrounds if it leaks into these areas. Adding a waterproofing product to the chimney can help prevent this from happening and extend its life.

While it is possible to clean the chimney on your own, it’s a big job and requires proper tools and ladders that can be used safely. First, make sure to purchase a brush that matches your chimney’s size and shape. Some brushes are designed to be used on round and square chimneys, while others only work on one type of design. After purchasing your brush, gather all of the other necessary cleaning supplies, including a mask and safety glasses. You will also need a sturdy ladder to get to the roof. Next, remove the chimney cap and shine a flashlight into the flue to see if there is any damage or a black, flaky substance, known as creosote.

Once you have a good view of the chimney, use a rod to push the brush up through the flue and around the sides of the chimney. After making several passes with the brush and rod, it should become easier to move the brush, which is a sign that the creosote is beginning to break up. Continue this process until all of the walls of the flue are brushed.

When you’ve finished, reattach the chimney cap and reinstall the damper handle and firebox door. Be aware that sweeping the chimney will drop piles of flaky creosote onto the damper and into the firebox. You can minimize this by giving the chimney and firebox a few minutes to settle before using a shop vac to vacuum up the mess.

Chimney flues and utility flues should be cleaned at least once a year. If they are blocked or clogged, harmful gases such as carbon monoxide will not be vented to the outdoors and could leak into the home.

A chimney cap serves several important functions, including keeping birds, animals, rainwater, leaves and debris out of the flue. It can also prevent fire embers from escaping the fireplace and hitting your roof or home.

A cap can prevent soot and creosote from contaminating the interior of the chimney. This is particularly important if you are using green wood (unseasoned). Unseasoned wood has so much moisture in it that it can cause a lot of smoke and soot, and a large amount of the combustion byproducts build up in the chimney and on the grate and chimney cap screen.

If your chimney has a metal chimney cap, it should be inspected for signs of rust. Galvanized steel will rust over time, and the metal can then become detached from the chimney cap and the masonry of the chimney crown. When this happens, a lot of water and other materials can enter the chimney and damage it, leading to structural issues.

During your annual chimney inspection, we will inspect the chimney cap to ensure that it is secure and intact. We will look for any cracks, missing pieces, or gaps in the chimney structure. We will also check how tightly the chimney cap is secured to the structure. Some caps use set screws that can loosen over time, allowing the chimney cap to come off during a strong wind.

In addition to ensuring that the chimney is properly capped, we will look at the condition of the chimney crown and the smoke chamber. Chimney masonry is prone to damage from extreme weather conditions, especially in areas with cold winters and snow. The constant freeze-thaw cycle causes bricks and mortar to crack and crumble, which can lead to leaks and serious structural problems.

The deterioration of masonry can lead to costly repairs. Chimney lining is recommended to prevent deterioration of the chimney masonry due to acidic deposits from burning fuel. In addition, a chimney liner is necessary to protect the structure of the chimney from corrosion and other damage. If you notice any signs of deterioration, it is vital that you have the chimney repaired immediately.

The best way to prevent chimney problems is to schedule annual chimney inspections. These regular, visual examinations ensure that all components of the chimney and fireplace are in good condition, and that there are no blockages or obstructions preventing efficient airflow. They also help to identify potential structural damage, as well as deteriorating bricks and mortar.

The yearly chimney inspection is also the ideal time to make any necessary repairs or replacements. For example, a cracked or crumbling chimney can allow moisture to seep into the masonry, which leads to serious water damage inside the home. In addition, a leaking flue liner can cause toxic carbon monoxide to enter the home, and a damaged chimney cap can let birds and debris into the chimney.

Over time, even properly maintained chimneys deteriorate and experience damage. The combination of extreme heat, acidic creosote deposits and the constant exposure to rain wears away at the masonry and mortar. In addition, the flammable by-products of wood burning fires can burn through the liners and cause damage.

A professional chimney sweep can identify these and other issues during a routine chimney inspection. He will examine the lining, damper, smoke chamber and baffle and look for signs of water intrusion. He will survey other accessible parts of the chimney, including the attic and crawl space, and he may use a video scan of the interior of the flue.

Chimneys are engineered to eliminate harmful gases from a home or business, so it’s essential that they work efficiently. An overabundance of creosote and soot deposits can create dangerous obstructions that prevent proper venting of the by-products of combustion. A CSIA certified chimney technician can remove these obstructions to minimize the risk of a chimney fire and reduce the risk of carbon monoxide poisoning.

A level 2 inspection is the most thorough and usually requires a professional to get on the roof and fully inspect the chimney from top to bottom. This is often required before selling a property, when a homeowner changes the type of fuel they are burning and after significant weather events like heavy storms, hurricanes or earthquakes. A level 3 inspection is typically reserved for situations in which a serious problem has been identified and needs more extensive investigation. This can require more substantial tools, and the chimney sweep may need to remove portions of the chimney or materials in the home like drywall to gain full access.

Stucco Services

Stucco Repair Secrets Revealed

Stucco Repair involves repairing cracks and addressing underlying water damage. Ideally, Stucco Repair Charleston SC completes the process and can handle other work, such as replacing damaged laths and installing new insulation.

Stucco Services

For cracks and small holes in your exterior stucco that are no more than 1/4-inch wide, consider using a premixed stucco patch you buy at your local hardware store. Apply it with a putty knife and allow it to set according to manufacturer instructions.

A number of home improvement stores carry stucco repair kits. These are marketed to do-it-yourselfers. But do they really work and are they a good choice? I’ll reveal some of the secrets behind these products and show you how to use them to achieve professional results.

When a plaster surface gets damaged, it needs to be repaired as soon as possible to prevent further damage and protect the underlying structure from water penetration. If water penetrates behind a crack, it can cause the plaster to loosen and crumble. In addition, the water can cause mold and mildew to grow on the underlying structure, which is not only unsightly but can be health hazard for anyone living in the house.

Depending on the type of crack, there are several different methods that can be used to fix it. For hairline cracks, acrylic exterior caulk is the most common. There are a few different brands to choose from, so be sure to read the reviews before choosing one. You may also want to try a sanded caulk if the crack has a rougher texture.

For larger cracks, you can fill them with a liquid cement and sand mixture. This is a simple task that any do-it-yourselfer can accomplish, but it should be done quickly so that the underlying concrete does not become compromised. This is important because if rainwater does penetrate the underlying concrete, it can cause major problems down the line that could be costly to repair.

In either case, it is imperative that you take care not to crack the underlying wood lath supports as you are working. If you have to use a hammer and cold chisel, be sure to protect them with a tarp or sheet of plywood. It is also important to know that simply filling a crack will not stop it from coming back. If the crack is caused by movement in the building, it will open and close again as the ground expands and contracts.

To stop these cracks from opening and closing again, you need to cover the crack with a pigmented coating that will blend it in with the surrounding stucco. There are many different options for this, such as acrylic elastomeric caulks, mineral paints and stains, lime washes and fog coats (a traditional cement based finish with aggregate). Choose one that will match the color of your existing stucco.

Repairing Leaks

Sometimes the source of water damage is obvious, such as a burst pipe, but other times it is not. Regardless of the cause, moisture intrusion in stucco will eventually lead to failure if left unaddressed for long periods of time. When moisture is trapped behind stucco it wets the wall interior and can lead to the rotting of wood sheathing, foam insulation, and the structural framing. This can be seen on the interior of the building as unsightly marks, spots, and stains. If a home owner suspects they have water damage in the house, it is recommended to contact a professional to perform a moisture test and/or a leak detection test to determine the source of the issue.

In addition to cracks and discoloration, another indication of moisture intrusion is the presence of moss or mildew on the exterior of a building. A good way to help prevent this type of problem is to apply a waterproof coating to the stucco such as Tex-Cote, which is formulated to defend against harsh climates and damaging insects.

The most common place to see signs of moisture intrusion in stucco is around windows. Leakage through the caulking, cracks in the stucco itself, or gaps between the window and the frame are very common. When a homeowner notices cracking and moisture intrusion in their stucco, they should check to see if the source of the problem is an internal issue such as a leaking washing machine or a burst pipe. If the source of the problem is an internal issue, homeowners insurance will typically cover the cost of a stucco restoration.

When homeowners are considering repainting their building’s exterior, it is also a good time to inspect and repair any issues with the stucco and its components. Many times, the extent of the repairs required is a lot larger than expected and may require the removal of the stucco down to the base layer. This can be costly but is often a necessary part of the process in order to remediate water damage and rot to the structure.

Remediating Cracks

A crack in stucco is a sign that it’s time for remediation. This is the process of repairing the underlying issues that caused the cracks, and is a more in-depth repair than just filling in the cracks. Remediation typically involves a full inspection of the entire wall system, as well as the removal of existing plaster and replastering. If a homeowner has a large crack or multiple cracks that are spreading quickly, it is probably best to call a professional for this type of work.

The first thing to do is to remove the loose plaster and debris from the area of the crack. This can be done with a putty knife, a hand trowel, or a wire brush. It is important to do a thorough inspection of the entire wall system, particularly in areas around windows where moisture tends to accumulate. This can help a homeowner to find and correct the underlying problem that is causing the deterioration, such as a leak.

If the underlying problem is found, a stucco pro will then replace the rotted and damaged sections of the wall system, including the lath and sheathing. Then, the new stucco will be installed using a proper application technique and a quality product to ensure long term performance.

Once the replastering is complete, and all of the lath and sheathing has been replaced, a proper flashing will need to be installed at the bottom of the walls. This will keep moisture from running down the back of the stucco and into the house. A tar paper can be used, but it is preferable to use a waterproof membrane that will seal the walls to prevent moisture intrusion.

After the flashing has been installed, a premixed stucco patching material should be applied to the cracked area. It is important to use a float and a wire brush to ensure the texture matches that of the rest of the wall system. Once the patching material is dried (as per manufacturer’s instructions), it should then be painted. The paint will protect the repaired area and also hide the patch.

Remediating Leaks

Stucco is a popular choice for building exteriors, especially in climates with frequent precipitation. However, like any wall surface, it can be prone to moisture infiltration. When this happens, it will eventually lead to a host of problems with the substrate and wood frame behind it. In addition, water infiltration can lead to mold and rot within the structure itself. If left unattended, this can result in expensive and even dangerous consequences.

The best way to prevent these problems is to identify and address the underlying causes as soon as possible. Fortunately, there are several warning signs to look out for. These include cracks in stucco, stains (often referred to as “stucco tears”) under windows or doors, dark spots around light fixtures, and more. It’s also important to check the condition of the caulking around these areas. If it has deteriorated, the area will allow water and air to penetrate behind the stucco, which will speed up the deterioration process.

A common cause of moisture intrusion is poor or incomplete flashing. This is typically an “L” shaped piece of metal that’s used to cover the gap between the stucco and the roof. This is particularly problematic in areas with southern exposures and gable tops. Other sources of moisture intrusion can be the result of insufficient weep screed, the incorrect use of materials, and even improper construction techniques.

If you see any of these warning signs, it’s important to call a stucco remediation specialist right away. Remediation is much more involved than repair, but it’s the only way to guarantee that your stucco will be able to withstand moisture for the long term.

Remediation involves removing the stucco down to the base layer and addressing any internal damage caused by moisture. It’s important to note that this is a more extensive and costly process than simply repairing the stucco itself. However, it’s also the only way to guarantee that the moisture will not return to the surface of the stucco. This makes it well worth the investment for most homeowners. If you’re thinking about hiring a company to perform stucco remediation, it’s best to consult with an experienced professional who can provide an accurate quote and estimate for the work.

Uncategorized

Troubleshooting With Tankless Water Heaters

If you have a water heater, you probably know that it requires some maintenance to keep running well. But, what do you do when the water heater stops working? You could have a small repair shop to come out and fix it for you, or you could learn how to do it yourself. There are a couple of steps to help make sure your water heater is running correctly. The first step is to turn the water off and then follow any emergency instructions provided by the manufacturer.

water heaters

Tank-type water heaters are relatively simple and easy to operate in terms of how they work, so there aren’t usually many things that will go wrong. When natural gas heaters heat water, the hot water is brought to the top of the storage tank, vented to a transfer vent. As the water reaches the temperature that was decided when the initial water heater was installed, a small valve shuts off the flow of gas and electricity. When the natural gas supply is shut off, the water begins to cool down. Hot water then enters the storage tank and is heated either by an electrical element, a gas burner, or a small thermostat.

Tankless water heaters, which use a nontoxic gas called propane, have no storage tank. Water is instead sent to the unit through a water pressure regulator, and it sits at the bottom of the storage tank. When the water is needed, the water is drained to the tank, and it becomes reheated as it sits there until needed. The repair shop can often install both types of tankless heaters, but it’s usually a much better idea to have a professional come out to repair the damage and make sure everything is operating correctly.

Many of the problems with older water heaters, like the age of the motors and the poor sealing around the tanks, can be solved by having the repair technician replace the motors. Sometimes it’s only one motor that needs replacing. More complex problems involving the valves, lines, or faucets can be fixed more easily by having a professional take care of the trouble. It may just be a matter of replacing the burned-out bulb.

One important thing to remember about tankless water heaters is that you should not use the water heater if you have an electrical service in your home. Damage may occur to your heating system if you overload or unplug the unit. The wires inside of a water heating system can become damaged if water leaks, leaky faucets, or improperly installed fixtures cause them to overheat. If you’re concerned about experiencing potential electric shock, a professional repair shop will be able to install an electrical transfer switch so your home’s water heating system can turn off on its own if there is a problem.

Heating problems with tankless water heaters usually involve the main water heater, which sits above the drain and on the floor in your basement. Though this might seem like the problem, in fact, it’s usually the condenser that produces the cold water that ends up leaking out through the pipe. As mentioned before, issues involving condensers and heating systems can be harder to troubleshoot, and you may need to call a contractor to do it. The most common issues with this part of the heating unit air leaks and clogging, especially when dirt and debris gets stuck in the condenser.

There are two ways to avoid making these common problems. First, make sure your drain is clear of any debris and that your water heater installation isn’t causing a blockage. Secondly, get a professional water heater repair person to check your system and replace the parts if needed. This is especially important if the issue is serious, because repairs can get very expensive.

If you’re having trouble with your heating system, contact your local heating company or the Better Business Bureau to find out if they offer water heater service. These professionals know all about heating systems and will be able to determine if the issue is with the heating element, the water heater, or both. In some cases, they can perform a scan to identify problems with both elements and come up with a solution. With ny water heater repair service available, you can get back to enjoying warm water right away!